Server-Side GTM Integration
Multi-touch attribution for any website — no backend code needed. Works with Webflow, WordPress, Squarespace, and any site with Google Tag Manager.
SDK vs sGTM — Which Is Right for You?
mbuzz has two ways to connect: server-side SDKs and server-side GTM. They do the same thing (send attribution data to mbuzz) but suit different teams.
Server-Side SDKs
Ruby, Node.js, Python, PHP
npm install, add middleware, done
Server-Side GTM
This page. Works with any website.
What is Server-Side GTM?
Normally, Google Tag Manager runs in your visitor's browser. Every tracking tag (GA4, Facebook, etc.) fires from the browser — where ad blockers can block it and Safari can expire your cookies after 7 days.
Server-side GTM moves that processing to a server you control. Your website sends one request to your server, and your server fans it out to all your analytics tools. Because the server runs on your domain, cookies are first-party and ad blockers can't touch them.
Client-Side (the old way)
Server-Side GTM (the right way)
Why You Need a Custom Domain
This is the single most important thing to understand about sGTM: your server must run on your domain. Without it, you lose most of the benefits.
| Without custom domain | With custom domain | |
|---|---|---|
| Your server URL | abc123.run.app |
sgtm.yoursite.com |
| Cookie type | Third-party | First-party |
| Cookie lifespan (Safari) | 7 days | 2 years |
| Ad blocker bypass | No | Yes |
| Attribution accuracy | Poor — visitors who take longer than 7 days to convert are lost | Full — visitors tracked across their entire journey |
What You Need (3 Things)
Setting up sGTM with mbuzz requires three pieces. Here's what each one is and how they connect.
Client-Side GTM
A small JavaScript snippet on your website. Sends page views and events to your sGTM server.
sGTM Server
A server that receives data from your client GTM and runs tags server-side. Lives on your domain (e.g. gtm.yoursite.com).
mbuzz Tag Template
A tag that runs inside your sGTM server. Sends visitor, session, and conversion data to mbuzz for attribution.
Data flow: Visitor loads your page → Web GTM fires two tags: GA4 direct + sGTM forward → sGTM tag sends to mbuzz API → Attribution calculated
Setup Guide
How long does this take?
- Already have sGTM running? Adding mbuzz takes ~15 minutes. Skip to Step 3.
- Setting up sGTM from scratch? Allow 2-4 hours. Most of that is DNS/domain configuration, which can take up to 72 hours for verification depending on your provider. This is a one-time setup.
Get an sGTM server running on your domain
You need a server to run your tags, and it must live on your domain (like
sgtm.yoursite.com) for first-party cookies to work.
There are a few ways to set this up.
This is the most time-consuming step. The server itself spins up fast, but connecting your custom domain involves DNS changes that can take anywhere from 30 minutes to 72 hours to verify.
Stape.io
Best value$20/month for 500K requests. Free tier available (10K requests/month for testing).
-
1
Create a server container in GTM. Go to tagmanager.google.com → Admin → Create Container → choose Server as the target platform. When prompted to set up your tagging server, choose "Manually provision tagging server".
Copy the Container Config string — you'll paste it into Stape next.
-
2
Create a Stape account and container. Sign up at stape.io, create a new sGTM container, and paste your Container Config string from GTM. Stape will spin up your server in about 2 minutes.
-
3
Set up your custom domain. This is the critical step — without it, your cookies are third-party and Safari kills them in 7 days.
- In your Stape container settings, add a custom subdomain (e.g.
sgtm.yoursite.com) - Stape gives you DNS records to add (usually an A record or CNAME)
- Go to your DNS provider (Cloudflare, GoDaddy, Namecheap, etc.) and add these records
- Wait for Stape to verify — usually 30 minutes, sometimes up to 72 hours
- SSL is provisioned automatically once DNS is verified
- In your Stape container settings, add a custom subdomain (e.g.
-
4
Verify it works. Visit
https://sgtm.yoursite.com/healthyin your browser. You should see a 200 response. If so, your server is live.
Common DNS pitfalls (save yourself hours):
- Cloudflare users: You must disable the orange proxy cloud for your sGTM subdomain (set it to DNS-only / grey cloud). This is the #1 reason domain verification fails.
- Duplicate records: Make sure you don't have existing A or AAAA records for the same subdomain. Remove any IPv6 (AAAA) records — they interfere with verification.
- SSL errors: If you use Cloudflare, set SSL/TLS mode to Full for your domain. "Flexible" mode causes redirect loops.
- Patience: DNS propagation genuinely takes time. If verification hasn't completed after 4 hours, double-check your records before changing anything.
https://sgtm.yoursite.com)
and a GTM server container ID (like GTM-XXXXXX).
Visit /healthy on your URL to confirm it's live.
Add an sGTM forwarding tag in your web GTM container
You need the regular Google Tag Manager snippet on your website. If you already have GTM on your site, you're set — just follow the steps below to add the sGTM forwarding tag.
Don't have GTM yet? Install it first
Webflow
Project Settings → Custom Code → paste in Head section
WordPress
Install the GTM4WP plugin and enter your container ID
Squarespace
Settings → Developer Tools → Code Injection → paste in Header
Any other site
Paste the GTM snippet into your HTML <head> tag. Google's installation guide
Key principle: your GA4 tag stays untouched
mbuzz uses a dual-tag architecture. Your existing GA4 tag keeps sending data directly to Google as it always has. You add a second Google Tag that sends a parallel copy to your sGTM server for mbuzz.
This means sGTM is never in the critical path for GA4. If your sGTM server goes down, GA4 keeps working. Only mbuzz data collection pauses until sGTM is back.
Create the sGTM forwarding tag
-
1
Open your web GTM container and go to Tags → New
-
2
Choose Google Tag as the tag type
-
3
Set the Tag ID to your GA4 measurement ID (the same
G-XXXXXXXXXXyour existing GA4 tag uses)The sGTM GA4 Client needs this measurement ID to parse the incoming request.
-
4
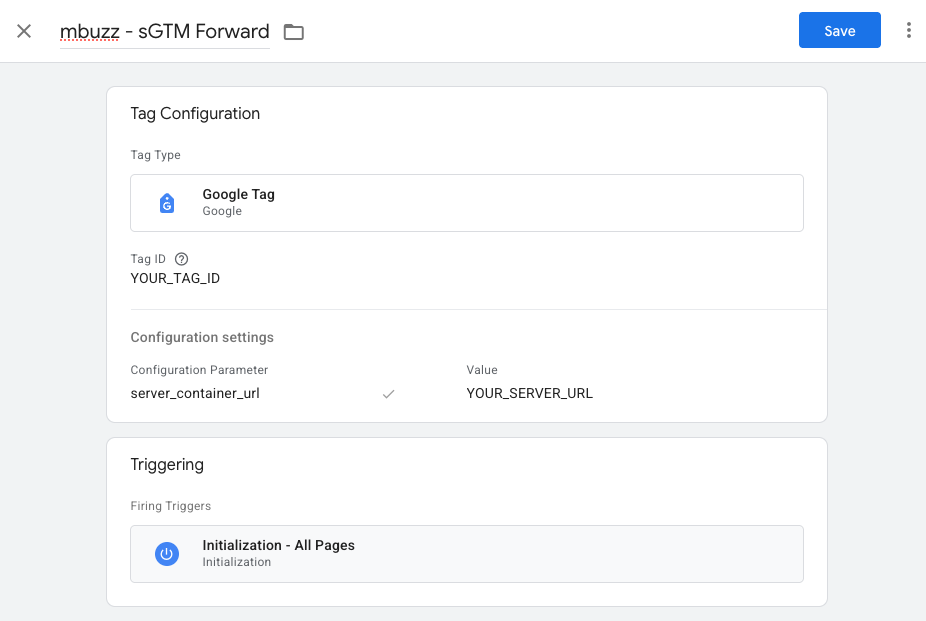
Under Configuration settings, add a parameter:
Configuration Parameterserver_container_urlValuehttps://sgtm.yoursite.comReplace with your sGTM server URL from Step 1.
-
5
Set the trigger to All Pages
-
6
Name it
mbuzz - sGTM Forwardand click Save
server_container_url) must keep sending to GA4 directly.
The new tag runs alongside it — same triggers, same measurement ID, but routing to sGTM instead.
mbuzz - sGTM Forward tag sending to your sGTM server.
Both fire on All Pages.
Add the mbuzz tag to your sGTM container
This is where mbuzz gets connected. You'll import our tag template, then create one tag per call type. mbuzz uses a 4-call model: Session, Event, Conversion, and Identify. Each tag is a separate instance of the same template with different settings.
Import the mbuzz tag template
- Open your server-side GTM container (not the client-side one)
- Click Templates in the left sidebar
- Under Tag Templates, click Search Gallery
- Search for "mbuzz"
- Click Add to workspace, then Add
template.tpl file.
Create the Session tag
Fires on every page view. Creates visitors and sessions with full attribution (UTM params, referrer, channel). This is the foundation — all other tags depend on it.
- Go to Tags → New
- Name it:
mbuzz - Session - Tag type: mbuzz — Server-Side Attribution
- Fill in the fields:
- Set the Trigger to All Pages (the default Page View trigger)
- Click Save
POST /api/v1/sessions.
mbuzz extracts UTM params from the URL, classifies the traffic channel, and creates or continues a session.
Create Event tags
Track mid-funnel actions: form submissions, button clicks, video plays, add-to-cart, etc. Create one tag per event type, or use a GTM variable for the event name. Not sure whether something is an event or a conversion?
- Go to Tags → New
- Name it:
mbuzz - Event - Form Submit(use your event name) - Tag type: mbuzz — Server-Side Attribution
- Fill in the fields:
- Set the Trigger to a Custom Event matching your event name (e.g.
form_submit) - Click Save
contact_form_submission,
not form_submit. Use regex matching if you want to catch multiple
variations (e.g. .*_form_submission).
form_submit,
add_to_cart,
button_click,
video_play,
scroll_depth,
file_download
Create the Conversion tag
Fires when a visitor completes a goal — purchase, signup, lead form, demo booking. This triggers multi-touch attribution calculation in mbuzz. — not sure which to use? For browser-only conversions (like phone clicks), see Tracking Client-Side Actions below.
- Go to Tags → New
- Name it:
mbuzz - Conversion - Purchase(use your conversion name) - Tag type: mbuzz — Server-Side Attribution
- Fill in the fields:
- Set the Trigger to a Custom Event matching your conversion event (e.g.
purchaseorgenerate_lead) - Click Save
.*_form_submission).
POST /api/v1/conversions
with the visitor ID, conversion type, and revenue. mbuzz looks at all sessions for this visitor and
calculates multi-touch attribution credit across every channel that contributed.
purchase,
signup,
lead,
demo_booked,
trial_started,
subscription
Create the Identify tag (optional)
Links an anonymous visitor to a known user from your CRM, auth system, or email list. Fire this when a user logs in, signs up, or submits their email.
- Go to Tags → New
- Name it:
mbuzz - Identify - Tag type: mbuzz — Server-Side Attribution
- Fill in the fields:
- Set the Trigger to a Custom Event matching your login or signup event
- Click Save
dataLayer.push({event: 'login', userId: '12345'})
from your site, then use {{DLV - userId}} as the User ID in the tag.
After Step 3, you should have these tags:
Test before publishing
GTM has a built-in preview mode that lets you verify everything works before going live.
mbuzz - Session tag
firing with a green checkmark on each page view.
Tip: Use a sk_test_* API key during testing.
Switch to sk_live_* when you're ready to go live.
Test data stays separate from production data.
Events vs Conversions
mbuzz tracks two types of visitor actions. Understanding the difference helps you set up the right tags.
Events
Actions a visitor takes on the way to a conversion. Mid-funnel engagement signals that show interest but aren't the end goal.
Conversions
The actions that matter most to your business. Conversions trigger multi-touch attribution — mbuzz looks at every channel that contributed and assigns credit.
Why Dual Tags Instead of GA4 Forwarding?
You might see other sGTM guides tell you to set server_container_url
on your main GA4 tag, routing all traffic through sGTM, then adding a GA4 forwarding tag in sGTM to send data back
to Google. We don't recommend this.
GA4 has no failover
When server_container_url is set on your main GA4 tag,
all hits route through your sGTM server. If that server goes down — Cloud Run scales to zero, SSL expires,
DNS breaks — GA4 receives nothing. There is no automatic retry. No fallback to
google-analytics.com. Data is silently lost.
This makes your sGTM server a single point of failure for all your analytics, not just mbuzz.
The dual-tag approach is safer
With mbuzz's approach, your original GA4 tag sends directly to Google — no sGTM in the way. A second Google Tag sends a parallel copy to sGTM for mbuzz. If sGTM goes down:
- GA4 keeps working — your analytics are unaffected
- Only mbuzz pauses — data collection resumes when sGTM is back
- No GA4 forwarding tag needed — your sGTM container only has mbuzz tags
server_container_url on your main GA4 tag?
Remove it. Create a separate mbuzz - sGTM Forward tag instead
(see Step 2). Your GA4 data will immediately
start flowing directly to Google again, and mbuzz will receive its copy via the parallel tag.
Tracking Client-Side Actions as Conversions
Some conversions happen entirely in the browser — like clicking a phone number or tapping a mailto link. These never hit your backend, but you can still track them through sGTM.
How it works: phone click example
tel: link on your sitehref="tel:..."mbuzz - sGTM Forward tag picks it up and sends it to your sGTM server.POST /api/v1/conversions to mbuzzSetting it up
tel:).
Create a GA4 Event tag that fires on this trigger and sends a custom event name (e.g. phone_link_click).
GA4-phone-link-click instead of phone_link_click).
phone_click). Attach the trigger from step 2.
Alternative: using a Data Client for JSON POST requests
Some sGTM providers (like Stape) offer a Data Client that accepts raw JSON POST requests instead of GA4-formatted payloads. Combined with a JSON HTTP request template, this lets you send conversion data from any source — including client-side JavaScript, webhooks, or third-party services.
When to use this: When the event doesn't originate from GA4 or your client-side GTM container. For example, a webhook from your phone system or a server-side event from a third-party CRM.
Setup: Add the Data Client to your sGTM container, install the JSON HTTP request template from the Gallery, and configure a trigger to match the incoming event. The mbuzz Conversion tag works the same way regardless of which Client processes the request.
How It Works Under the Hood
You don't need to know this to use the integration. But if you're curious about what the mbuzz tag actually does:
What happens on every page view
_mbuzz_vid cookie. If it's a new visitor, generates a random 64-character ID and sets the cookie (first-party, 2-year expiry, HttpOnly).SHA256(ip|user_agent). This is how mbuzz links sessions to the same device.Automatic channel classification
mbuzz automatically classifies every session into a channel based on UTM parameters and referrer:
Tag Configuration Reference
Fields for all tag types
| Field | Required | Description |
|---|---|---|
| API Key | Yes | Your mbuzz key (sk_live_* or sk_test_*) |
| Call Type | Yes | Session, Event, Conversion, or Identify |
| API URL | No | Default: https://api.mbuzz.co/api/v1. Only change for testing. |
| Debug | No | Log requests to sGTM console (disable in production) |
Additional fields for Event tags
| Field | Required | Description |
|---|---|---|
| Event Type | Yes | Name of event (e.g. form_submit, add_to_cart) |
| Custom Properties | No | Key-value pairs (e.g. form name, button label) |
Additional fields for Conversion tags
| Field | Required | Description |
|---|---|---|
| Conversion Type | Yes | purchase, lead, signup, etc. |
| Revenue | No | Revenue amount (use a GTM variable like {{Revenue}}) |
| Currency | No | Default: USD |
| Custom Properties | No | Key-value pairs (e.g. order ID, product name) |
Additional fields for Identify tags
| Field | Required | Description |
|---|---|---|
| User ID | Yes | Your internal user ID (from CRM, auth, or email system) |
| Custom Properties | No | User traits as key-value pairs (e.g. email, name, plan) |
Troubleshooting
Tags not firing in preview mode
Check 1: Are you in the server-side GTM container? The mbuzz tag is an sGTM tag, not a client-side tag. You should see "Server" in the GTM header.
Check 2: Does your web GTM container have the mbuzz - sGTM Forward tag? It should be a Google Tag with server_container_url pointing to your sGTM server.
Check 3: Is the tag published? Click Submit in GTM to publish. Preview mode uses the unpublished workspace, so it should work — but double-check the tag is saved.
No data appearing in mbuzz dashboard
Check 1: Is the API key correct? Copy it again from your mbuzz dashboard. Make sure it starts with sk_live_ (or sk_test_ for test mode).
Check 2: Enable Debug mode on your tag and check the sGTM logs. Look for HTTP response codes — 401 means wrong API key, 422 means bad data.
Check 3: Make sure the Session tag fires before any Event or Conversion tags. Without a session, events are rejected.
Events being rejected ("Visitor not found")
The Session tag must fire before any Event or Conversion tag. The session call creates the visitor — without it, mbuzz doesn't know who the event belongs to.
Fix: Make sure the Session tag has an All Pages trigger so it fires on every page view. The Session tag creates the visitor — Event and Conversion tags read the same _mbuzz_vid cookie automatically. As long as the visitor has loaded at least one page, subsequent tags will have the visitor ID they need.
Event or Conversion tag fires but no data appears
Check the trigger event name. The most common cause is a mismatch between the event name in your trigger and the actual event name in the sGTM data stream.
How to find the correct name: Open Preview mode in your sGTM container, trigger the action on your site, and look at the event name in the preview sidebar. Use that exact name in your Custom Event trigger.
For example, a form submission might appear as contact_form_submission (not form_submit), and a phone click might appear as GA4-phone-link-click (not phone_click).
Tip: Enable regex matching on your trigger if you want to catch multiple event name variations (e.g. .*_form_submission).
Cookie not being set
Check 1: Your sGTM container must be on the same root domain as your website. If your site is example.com, your sGTM should be sgtm.example.com (not a different domain). This is what makes cookies first-party.
Check 2: Your sGTM container must use HTTPS. Cookies with the Secure flag require HTTPS.
Check 3: If you specified a custom cookie domain in the tag settings, make sure it matches your site's domain.
Check 4: If you're using the default .run.app or .stape.io domain (not your own), cookies are third-party. Safari limits these to 7 days. You need a custom domain.
Custom domain not verifying (Stape)
Cloudflare proxy: The most common cause. Your sGTM subdomain record must be set to DNS only (grey cloud), not proxied (orange cloud). Stape needs to reach the server directly for verification.
Duplicate records: Check that you don't have multiple A records or any AAAA (IPv6) records for the same subdomain. Remove duplicates and any AAAA records.
SSL/TLS mode: If using Cloudflare, your SSL/TLS encryption mode must be set to Full (not "Flexible"). Flexible mode causes redirect loops.
Wrong values: Go to your Stape container settings and compare the DNS records shown there against what's in your DNS provider. They must match exactly.
Give it time: DNS propagation typically takes 30 minutes to 4 hours. Some providers (especially older ones) can take up to 72 hours. Don't keep changing records — give each change time to propagate before troubleshooting further.
GCP automatic provisioning: should I use it?
For testing only. The "Automatically provision tagging server" button in GTM creates a Cloud Run instance in us-central1 that runs on a .run.app domain. Cookies set from this domain are third-party — Safari limits them to 7 days and ad blockers can block them.
It's fine for a quick test to see how sGTM works, but for production you'll need either a managed provider (Stape, Addingwell) with a custom domain, or a manual GCP setup with a load balancer and your own subdomain. See Step 1 for the full walkthrough.
GA4 stopped working after setting up sGTM / mbuzz
This is almost always a missing GA4 forwarding tag. When you set server_container_url on your client-side Google Tag, all GA4 hits are redirected to your sGTM server. If the server container doesn't have a Google Analytics: GA4 tag to forward them to Google, GA4 receives nothing.
Quick fix: In your server-side container, create a new Google Analytics: GA4 tag with an All Pages trigger. Leave the Measurement ID blank (it inherits automatically). Publish the container. See GA4 Forwarding for full instructions.
Emergency rollback: If you need GA4 working immediately, remove the server_container_url parameter from your client-side Google Tag. This restores direct GA4 tracking while you fix the server container. mbuzz will stop receiving data until you re-add it.
I already use GA4 in my sGTM — do I need to change anything?
No. The mbuzz tag runs alongside your existing tags. It doesn't interfere with GA4, Facebook CAPI, or any other tag. Just add the mbuzz tags and attach them to the same triggers your GA4 tags use.
Consent Mode
If you use a Consent Management Platform (CMP) like Cookiebot or OneTrust, the mbuzz tag respects GTM's consent settings automatically:
No extra configuration needed in the mbuzz tag. It inherits your GTM container's consent settings.
Video Tutorials & Learning Resources
sGTM setup is easier to follow visually. These are the best free resources we've found — they cover the general sGTM setup process. Once your sGTM server is running, come back here for the mbuzz-specific tag configuration (Steps 3-4 above).
Analytics Mania — Server-Side Tagging Tutorial
Start hereBy Julius Fedorovicius. 45-minute video + written guide.
The most beginner-friendly walkthrough. Covers what sGTM is, why it matters, container creation, server provisioning, and connecting GA4. Updated regularly. If you watch one thing, make it this.
MeasureSchool — How to Set Up Server-Side Tagging
Step-by-step written guide with video companion.
Good for people who prefer following written steps alongside video. Covers the full setup including GCP configuration and domain mapping.
Simo Ahava — Cloud Run with Server-Side Tagging
Deep technical blog post. The definitive GCP reference.
If you're self-hosting on Google Cloud, this is the guide. Covers Cloud Run deployment, load balancer setup, domain mapping, SSL certificates, and debugging. Written by the most respected voice in the GTM community.
Stape Academy — Free sGTM Courses
Platform-specific guides (Shopify, WooCommerce, WordPress).
If you're using Stape as your sGTM host, their academy has step-by-step guides specific to their platform. Particularly useful for Shopify and WooCommerce setups.
Events vs Conversions
Events
Actions on the way to a conversion. Mid-funnel engagement signals.
Conversions
Goals that trigger multi-touch attribution. The actions that matter most.